Raspberry Pi remote access made simple: How to connect from anywhere


A Raspberry Pi can run without its own screen or input devices. If you want to manage it remotely, several connection methods are available, from terminal commands and file transfers to browser-based or client-based desktop control.
This guide explains the main ways to remotely access a Raspberry Pi, how they differ, and which option makes the most sense for different setups.
Note: This article refers to self-hosted virtual private network (VPN) setups that let you securely reach your home network and Raspberry Pi from outside, rather than consumer VPN services such as ExpressVPN, which route your outbound traffic through a private server.
What Raspberry Pi remote access allows
Remote access lets you manage a Raspberry Pi over a network instead of through hardware connected directly to the device. Depending on the method and account permissions, remote access can let you:
- Run terminal commands.
- Install software and edit configuration files.
- Transfer or manage files.
- Access the Raspberry Pi desktop interface.
- Restart services or reboot the system.
Remote access is commonly used for servers, Internet of Things (IoT) projects, and headless systems that run without a dedicated screen, keyboard, or mouse.
Also read: What can you do with a Raspberry Pi? Real ideas that work.
What you need before you start
Remote access is easier to set up when the Raspberry Pi is already configured. Before choosing a connection method, it helps to have:
- A Raspberry Pi running a supported, updated version of Raspberry Pi OS.
- A Wi-Fi or Ethernet connection for the Pi.
- The credentials required by your chosen method, such as a username and password, a Secure Shell (SSH) key, or a Raspberry Pi ID
- Another computer, phone, or tablet from which to connect.
- Access to router, firewall, or self-hosted virtual private network (VPN) settings if your chosen internet access method requires network configuration.
Which remote access method should you choose?
Different remote-access methods provide different capabilities. These are the main options available:
- Raspberry Pi Connect: Browser-based remote-shell access and screen sharing.
- SSH: Command-line access for managing the Pi without a graphical interface.
- Virtual network computing (VNC): Screen sharing for viewing and controlling the Raspberry Pi desktop.
- Microsoft Remote Desktop Protocol (xrdp): An open-source RDP server that lets Remote Desktop clients connect to a graphical Linux desktop session.
Local-network vs. internet-based access
Local-network access means your Raspberry Pi and the device you’re connecting from are on the same network. This usually provides lower latency and more responsive performance. Internet-based access lets you connect to your Raspberry Pi from outside your local network, and this usually requires additional setup.
Here’s a brief overview of the methods, their typical uses, and where additional configuration may be needed:
| Access type | Common methods | Additional setup | Typical use |
| Local-network access | SSH, VNC, xrdp | Enable and configure the chosen service; no internet-access configuration required | Development, testing, and administration |
| Internet access through Raspberry Pi Connect | Raspberry Pi Connect | Link the Pi to a Raspberry Pi ID; no router or firewall changes required | Remote management, travel access, and off-site monitoring |
| Internet access through a private network | VPN-based SSH, VNC, or xrdp | Configure the VPN and chosen remote-access service | Secure access to the Pi and other local services from outside the network |
Read more: RDP vs. VPN: The complete guide to remote access, security, and speed.
How to access your Raspberry Pi over the internet
Remote access over the internet usually requires additional networking configuration or a secure connection method. Common approaches include port forwarding, VPNs, and browser-based services such as Raspberry Pi Connect.
Using port forwarding and dynamic DNS
Port forwarding allows connections from the internet to reach your Raspberry Pi by directing traffic from your router to the device. This can make services such as SSH, VNC, or xrdp available outside your local network.
Some direct internet-access setups rely on your home network’s public IP address to reconnect remotely. If that address changes over time, dynamic Domain Name System (DDNS) can provide a stable hostname that automatically points to the current address.
However, exposing services directly to the internet can increase their exposure to unauthorized connection attempts and requires careful security configuration. Many users instead use Raspberry Pi Connect, which provides its own encrypted remote-shell and screen-sharing connections, or access SSH, VNC, or xrdp through a VPN.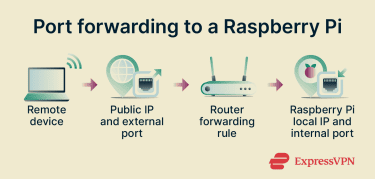
Using a VPN
A self-hosted VPN creates a private, encrypted connection between a remote device and your home network. This could be a VPN server running on your router, Raspberry Pi, or another device on the network. Once connected, the Raspberry Pi can often be accessed as it would on the local network.
This approach avoids exposing SSH, VNC, or xrdp directly to the internet through open ports. Instead, remote-access traffic travels through the VPN connection. The VPN server itself may still require an open port, but the individual remote-access services remain unavailable directly from the internet.
Remote access setup guide
The sections below explain how to set up the main Raspberry Pi remote-access methods and when each option makes the most sense to use.
Method 1: Raspberry Pi Connect
Raspberry Pi Connect is a browser-based remote access service for Raspberry Pi OS. It supports remote-shell access and, on supported desktop systems, screen sharing directly from a web browser.
When to use
Raspberry Pi Connect works best when you want simple remote access without configuring port forwarding or VPN connections. It’s particularly useful for browser-based access, quick maintenance tasks, and setups where you want terminal and desktop access in one place.
Requirements and limitations
Raspberry Pi Connect requires Raspberry Pi OS Bookworm or later and an internet connection. Full performance is supported on Raspberry Pi 5, Pi 4, and Pi 400 models.
Terminal access works on all supported Raspberry Pi OS installations. Desktop sharing requires Raspberry Pi OS with a supported Wayland desktop session and is not available on older models such as Raspberry Pi 3, Pi 2, and Zero, or on Raspberry Pi OS Lite or systems using the older X11 desktop.
Setup
- Create a Raspberry Pi ID account or sign into your existing account. The device will be linked to the account when you turn on Connect and complete the sign-in process.
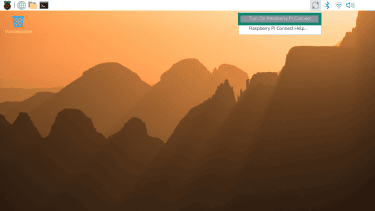
- Select the Connect icon in the menu bar and click Turn On Raspberry Pi Connect.
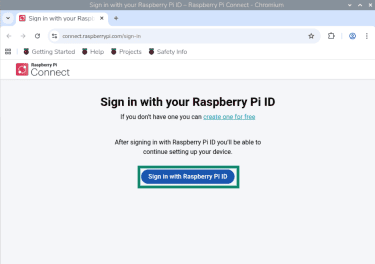
- Follow the prompt to Sign in with your Raspberry Pi ID and assign a device name so you can identify it later in the dashboard.
- Open the Connect menu and choose Allow Screen Sharing, Allow Remote Shell Access, or both.

- Optional: Connect normally requires an active user session. To keep remote-shell access available after a restart without logging in, run the loginctl enable-linger command. Screen sharing requires an active graphical session, so enable Desktop Autologin if screen sharing must be available after startup.
Connect
Once your device appears in the Connect dashboard, you can normally access it from a browser without additional network configuration.
- Visit connect.raspberrypi.com and click Sign in with your Raspberry Pi ID.
- Go to the Devices tab, find your device, and select Connect via to view the available access options.
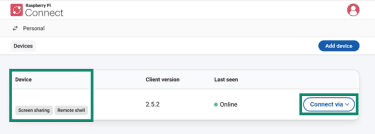
- Select Screen sharing for desktop access or Remote shell for terminal access.
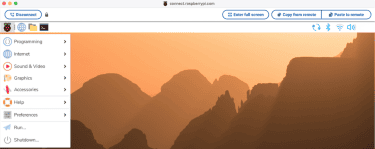
- The browser opens either a desktop-sharing session or a terminal window for remote access.
- When finished, close the session or select Disconnect to end the connection.
Method 2: SSH
SSH provides terminal access to your Raspberry Pi from another device, allowing you to run commands, manage files, install software, and control services without using the desktop interface.
When to use
SSH works best for command-line administration, development work, automation, and headless Raspberry Pi setups. Because it only transmits terminal data rather than a full desktop session, it usually uses fewer system and network resources than remote desktop tools.
Requirements and limitations
SSH works on all supported Raspberry Pi OS versions, but it must be enabled before remote connections are allowed. SSH only provides terminal access; it doesn’t include a full graphical desktop interface.
Setup
Enable SSH on your Raspberry Pi, then note the username and network address you’ll use to connect.
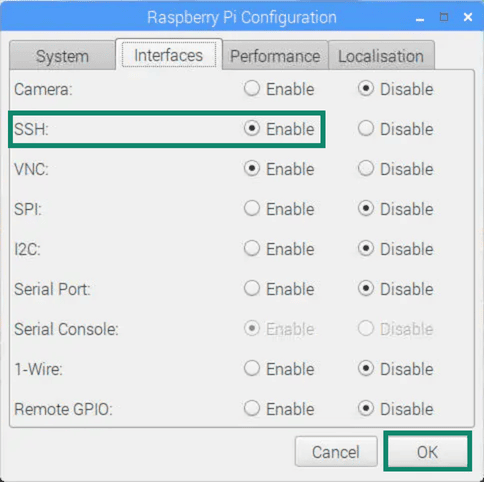
- To enable SSH from the desktop, open Control Centre and go to the Interfaces tab. Select Enable next to SSH and click OK.
- Make sure the Pi is connected through Wi-Fi or Ethernet so other devices can reach it.
- Choose an authentication method. SSH supports both password-based login and SSH key authentication. Password login works if password authentication is enabled for the Raspberry Pi account, while SSH keys provide a more secure option for regular remote access.
Finding your Raspberry Pi IP address
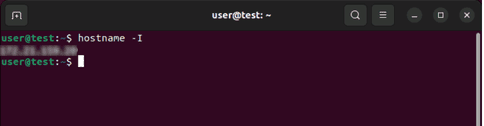
You’ll usually need the Raspberry Pi’s local IP address or hostname to connect over SSH. Here’s how to find the address:
- Check directly on the Raspberry Pi: Run hostname -I in a terminal window to display the current local IP address.
- Check your router’s device list: Most routers display connected devices and their assigned IP addresses.
- Use the hostname on supported networks: Some systems support connections using names such as raspberrypi.local instead of the IP address.
Read more: Check out our detailed guide on how to find your Raspberry Pi IP address quickly and easily.
Connect
Once SSH is enabled and you know the Raspberry Pi’s address, you can connect from another device. Here’s how:
- Open a terminal application: Use Terminal on macOS or Linux, or PowerShell, Command Prompt, or Windows Terminal on Windows.
- Run the SSH command: Enter ssh <username>@<ip address> using your Raspberry Pi username and IP address.
- Accept the host key on first connection: Type yes if prompted to trust the device. This usually appears only the first time you connect, unless the device’s host key changes or the address is reused.
- Sign in: Enter your password or use your configured SSH key.
- Start using the terminal: After connecting, you can run commands and manage the Raspberry Pi remotely.
Method 3: VNC
VNC provides remote access to the Raspberry Pi desktop from another device. It allows you to view and control the graphical interface, including applications, menus, and system settings. Raspberry Pi OS includes built-in VNC support, so you only need to enable it and connect with a compatible VNC client.
When to use
VNC works best when you need access to the Raspberry Pi desktop rather than terminal-only control. It’s useful for tasks that are easier to manage visually.
Requirements and limitations
VNC requires Raspberry Pi OS with a graphical desktop environment. It won’t work on terminal-only installations such as Raspberry Pi OS Lite unless you install and configure a desktop environment separately.
Because VNC connects to the Raspberry Pi desktop, it uses more system and network resources than SSH, which transmits only a command line.
Setup
Use Raspberry Pi OS Desktop and install a VNC viewer on the device you’ll connect from.
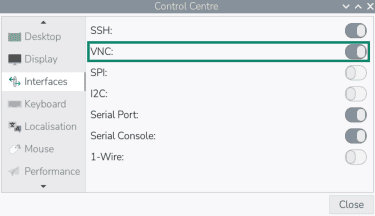
- Open Control Centre and go to the Interfaces tab to enable VNC. You can also run sudo raspi-config, select Interface Options, and enable VNC there.
- Download a compatible VNC viewer, such as TigerVNC, on the device you’ll use to connect.
Connect
Once VNC is enabled and your client is installed, you can connect using the Pi’s IP address or hostname. Make sure your Raspberry Pi and the device running the VNC viewer are on the same local network, or connected through a VPN.
- Launch the VNC viewer on your computer or mobile device.
- Type the Raspberry Pi’s IP address or hostname into the connection field.
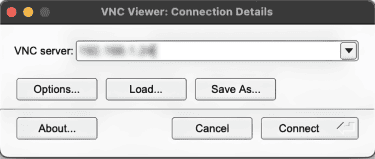
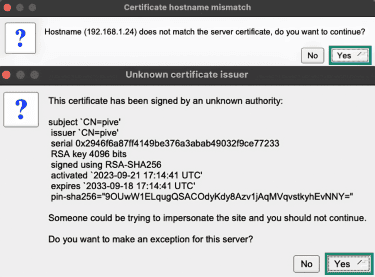
- Click Connect and review any certificate or authentication prompts. If the address matches your Raspberry Pi, click Yes to accept the prompt to continue.
- Enter the username and password for your Raspberry Pi account and click OK.
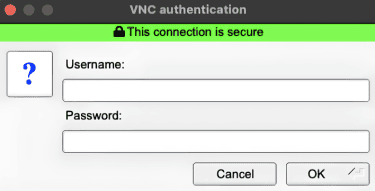
- The Raspberry Pi desktop opens in a window, allowing you to control it remotely with your keyboard and mouse.
Method 4: xrdp
Xrdp allows your Raspberry Pi to accept Remote Desktop Protocol (RDP) connections from applications such as Microsoft Remote Desktop. It provides graphical desktop access via the same Remote Desktop clients commonly used on Windows systems.
When to use
Xrdp works best when you want to access the Raspberry Pi desktop via a standard Remote Desktop client rather than a VNC application. It’s particularly useful in Windows-focused environments where Remote Desktop tools are already part of the workflow.
Requirements and limitations
Xrdp requires Raspberry Pi OS Desktop or another graphical desktop environment. It won’t work on terminal-only installations unless you install and configure a desktop environment separately.
Unlike SSH or VNC, which Raspberry Pi OS supports via built-in remote access settings, xrdp is not included by default and must be installed manually. On current Raspberry Pi OS releases, xrdp may also require additional Xorg or session configuration because Raspberry Pi OS uses Wayland by default for its desktop.
Setup
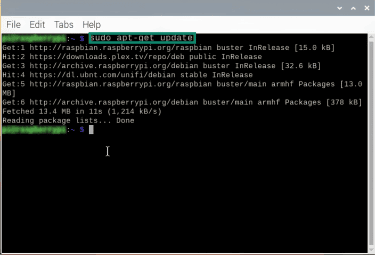
Use Raspberry Pi OS Desktop, then open a terminal on the Raspberry Pi or connect through SSH to run the setup commands.
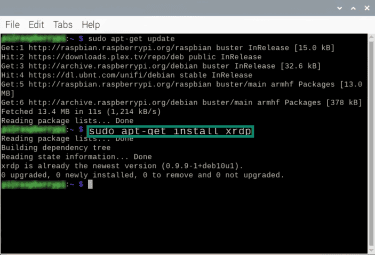
- Run sudo apt-get update to refresh the package list.
- Run sudo apt-get install xrdp to install the xrdp server and required components.
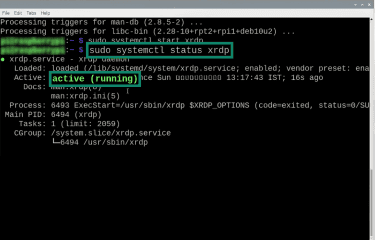
- Run systemctl status xrdp and check that the service is active. If needed, start it with sudo systemctl start xrdp.
If your Raspberry Pi uses a firewall, allow RDP connections on port 3389 only from your local network or VPN subnet. Avoid opening port 3389 broadly with sudo ufw allow 3389/tcp. If your device is internet-facing, anyone who discovers your IP address could scan for the open port and attempt brute-force logins, particularly if password-based authentication is in place.
Instead, restrict access to your local network or VPN subnet: sudo ufw allow from 192.168.1.0/24 to any port 3389 proto tcp, replacing the example subnet with your own network range.
Connect
Once xrdp is installed and running, you can connect using any RDP-compatible client.
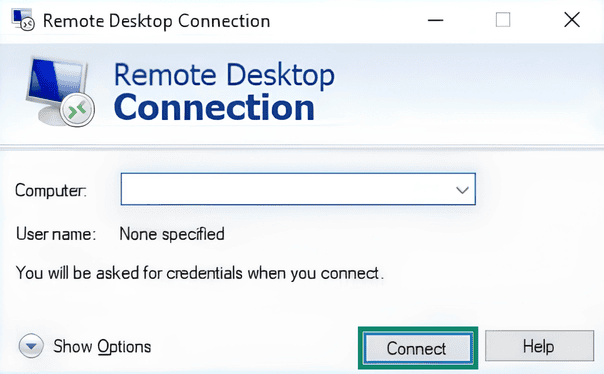
- Open an RDP client. On Windows, use Remote Desktop Connection. Other platforms can use Microsoft Remote Desktop or another compatible RDP client.
- Type the Raspberry Pi IP address or hostname into the connection field, then click Connect.
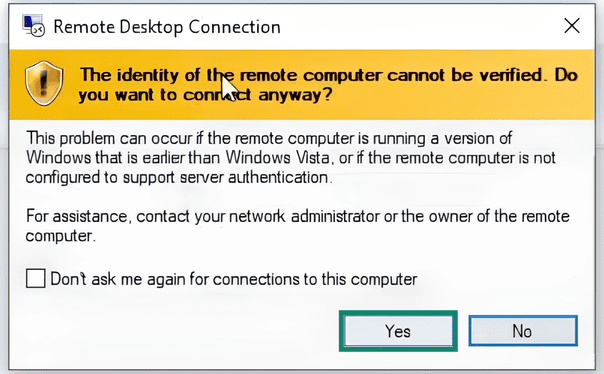
- Start the connection and review any certificate prompts. If the address matches your Raspberry Pi, click Yes to accept the prompt to continue.
- Enter the username and password for your Raspberry Pi account.
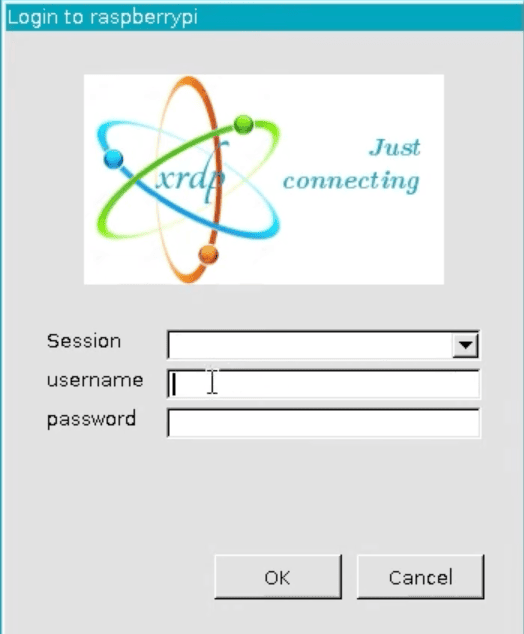
- The Raspberry Pi desktop opens inside the RDP window.
Troubleshooting remote access
Remote-access problems are usually related to connectivity, performance, or authentication. Common issues include:
Connection problems
These are some of the most common connection issues you may encounter, with possible fixes:
- Device unreachable: Verify the Raspberry Pi IP address or hostname. Local IP addresses can change after reboot, and .local hostnames may not work on every network.
- Connection refused: Check that the remote-access service is running and listening on the expected port. Restart the service if needed.
- Device appears offline (Connect): Run rpi-connect status to confirm the device is signed in and connected to the service.
- Screen sharing unavailable (Connect): Confirm screen sharing is allowed, the Pi is running a supported Wayland desktop session, and the system is not using Raspberry Pi OS Lite or X11. Run rpi-connect doctor to check communication and local support.
- Internet access fails: Check that port forwarding, VPN access, or another external access method is configured correctly. For Raspberry Pi Connect, port forwarding is typically not required, but restrictive networks may block the connections it uses.
- Connection fails after reboot: Check whether the remote-access service depends on an active user session after startup. For Connect, enable user lingering to keep remote shell available after reboot. Screen sharing still requires an active graphical desktop session, so Desktop Autologin may be needed.
Performance issues
- Desktop sharing is slow: Methods such as VNC or xrdp usually use more bandwidth and system resources. Switching to SSH or reducing background activity may help.
- Performance varies across sessions: Raspberry Pi Connect may route connections through its servers instead of connecting directly, which can increase latency. Direct connections usually feel more responsive.
- Input lag: High network latency or system load can delay mouse and keyboard response. Reducing background activity may help improve responsiveness.
- Delayed screen updates: Internet connections with limited bandwidth or high latency can reduce desktop-sharing performance. Local-network access may improve performance.
- Unexpected display behavior (Connect): Connect supports sharing a single primary display. On multi-display setups, it may share the secondary screen; changing the taskbar location in Desktop Preferences may help.
Login problems
Authentication and session issues can also prevent remote access. This may be due to:
- Incorrect credentials: Use the credentials for the Raspberry Pi user account created during setup.
- SSH key authentication fails: Check that the public key is listed in ~/.ssh/authorized_keys and that the SSH client is using the correct key. Add the key if it’s missing.
- Session closes immediately after login: For xrdp, check the desktop environment and session configuration. For VNC or Connect screen sharing, confirm that a supported graphical desktop session is running.
- Desktop sharing doesn’t appear (Connect): Confirm that the Raspberry Pi is logged into the desktop using the same user account used for Connect.
- Repeated authentication prompts: Check that the correct password, SSH key, or authentication method is being used.
Best security practices for Raspberry Pi remote access
Remote access makes a Raspberry Pi easier to manage, but it can also expose the device to unauthorized access if it’s configured poorly. These practices can help improve remote-access security:
- Minimize exposure: Disable remote-access services you no longer use, and remove unused Raspberry Pi Connect devices from your account.
- Limit direct internet exposure: Expose remote-access services to the internet only when necessary. VPNs, firewall rules, and secure authentication can help reduce risk when using SSH, VNC, or xrdp remotely.
- Secure your Raspberry Pi ID: Use strong, unique passwords and enable two-factor authentication (2FA) on your Raspberry Pi ID. Remove unknown or unused devices from the Connect dashboard.
- Use SSH keys instead of passwords: Configure SSH key authentication where possible, and disable password-based SSH login if you don’t need it. Modern key types, such as Ed25519, provide stronger protection than reusable passwords.
- Restrict remote access: Limit which users can connect remotely and allow only required ports or services through the firewall. Where possible, restrict access to trusted local networks or VPN subnets.
- Keep systems updated: Install Raspberry Pi OS and software updates regularly. Updates help patch vulnerabilities in remote-access software and the OS.
FAQ: Common questions about Raspberry Pi remote access
What is the easiest way to remotely access a Raspberry Pi?
Can I remotely access a Raspberry Pi without a monitor?
What is the difference between SSH, VNC, and xrdp?
Is Raspberry Pi Connect free to use?
Can I access my Raspberry Pi from my phone?
Why is my Raspberry Pi remote access so slow?
Do I need a VPN for Raspberry Pi remote access?
Take the first step to protect yourself online. Try ExpressVPN risk-free.
Get ExpressVPN