How to transfer files from PC to Mac (and vice versa)


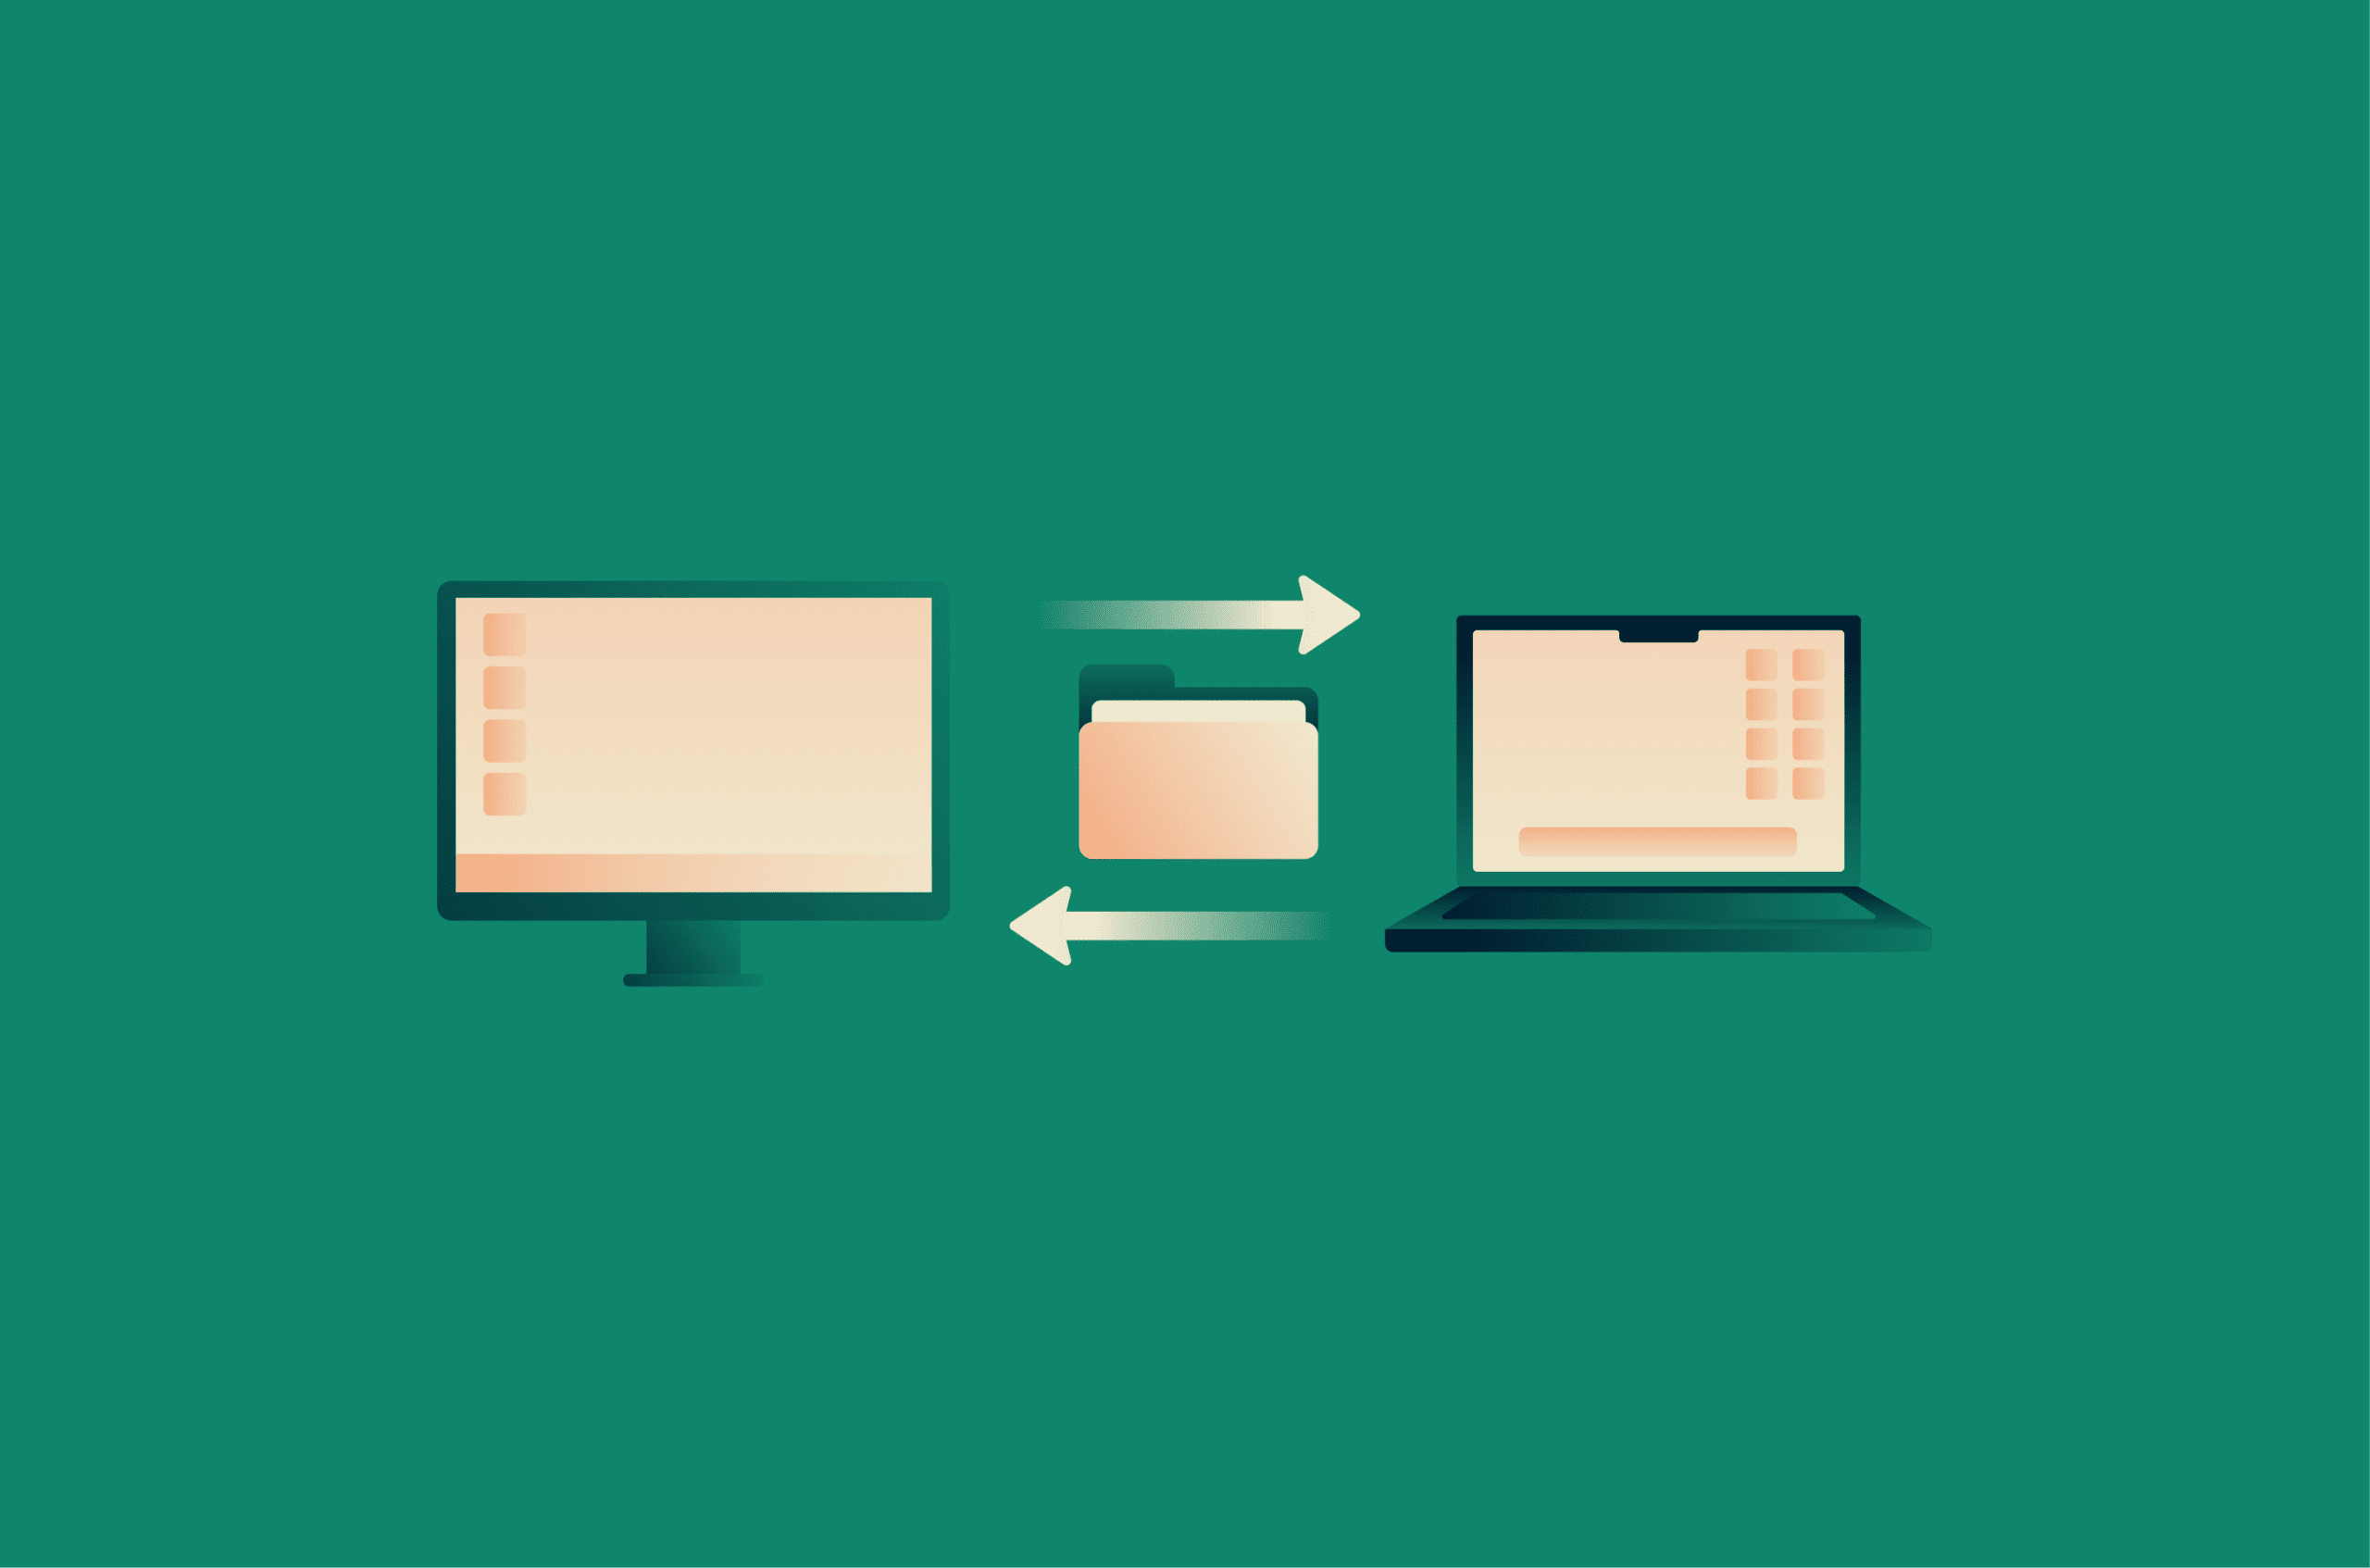
Moving files between a Windows PC and a Mac is straightforward using built-in tools such as local network sharing via Server Message Block (SMB), external drives formatted for both systems, and secure cloud services. If moving from a Windows PC to a Mac for the first time, Apple’s Migration Assistant can also help transfer data.
This guide provides a step-by-step walkthrough of the most common methods, plus preparation tips, troubleshooting steps, and best practices to keep your data safe.
Before you transfer files
- Back up the files you plan to transfer: Create copies on an external drive or in the cloud so they’re recoverable if anything goes wrong during the process.
- Update both devices: Install the latest system updates to prevent compatibility issues, software bugs, or security vulnerabilities that could interrupt the transfer.
- Connect both machines to the same network: If using network sharing or Migration Assistant, use the same network for a smoother, faster transfer, especially when moving large files or many files.
- Gather your account credentials: Note login details for any accounts or services you might need, such as a cloud storage account or a shared network login.
- Encrypt sensitive files: Protect important data before transfer by using encrypted archives or encrypted storage. On macOS, Disk Utility can encrypt a disk image or removable drive.
Choose the best transfer method
To help you choose the best approach, here’s an outline of the available methods for moving files between Windows and macOS devices:
| Method | Best for | Speed | Security | Requires internet? | File size limit? |
| Windows/macOS file sharing | Local network transfers | Fast, especially over wired connections | High on a trusted local network, depending on sharing and firewall settings | No | Usually no practical limit |
| Apple Migration Assistant | Transferring accounts and user data from a Windows PC to a Mac | Fast, especially with Ethernet | High | No | No practical limit |
| External storage devices | Offline file transfers | Fast with USB-C/Thunderbolt or high-speed SSDs | High | No | Depends on the hardware and drive format |
| Cloud storage | Syncing files across networks | Moderate | High if you use a reputable encrypted service | Yes | Depends on the provider and plan |
| Small files or one-off transfers | Slow | Moderate, depending on the provider | Yes | Depends on the provider | |
| Bluetooth | Small files | Very slow | Moderate; better suited to convenience than sensitive data | No | Depends on the device and software |
| File transfer services | One-off transfers | Moderate | Moderate to high, depending on the provider | Yes | Depends on the provider |
How to transfer files from PC to Mac
While there’s some overlap, the process for transferring files from PC to Mac is slightly different from that for transferring from Mac to PC.
Use Windows file sharing
You can use Windows’ built-in file sharing to transfer files not only between Windows devices but also across to other platforms, including macOS.
- Open File Explorer and find the folder you want to share. Right-click it and select Properties.
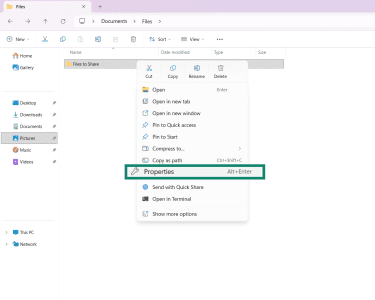
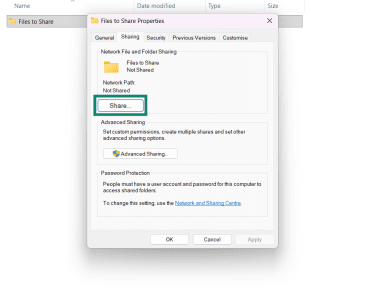
- Go to the Sharing tab and click the Share... button.
- Click the drop-down menu and choose the username you want to share the folder with. Then, click Add.
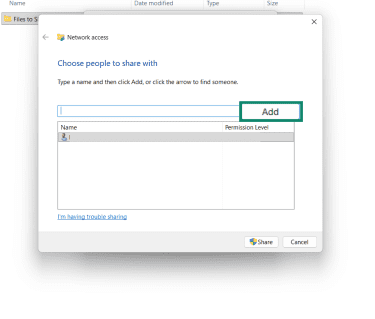
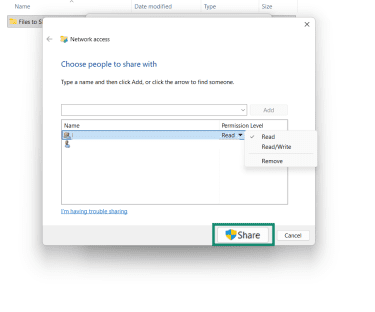
- In the Permission Level column, use the dropdown menu to change permissions between Read and Read/Write, then click Share.
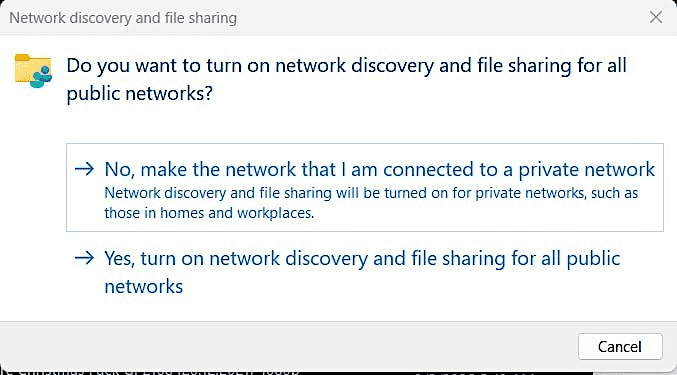
- If network discovery and file sharing are turned off, Windows may prompt you to enable them. Use sharing only on a trusted private network, such as a home or office network you control. You may want to set the network profile to private for this kind of sharing.
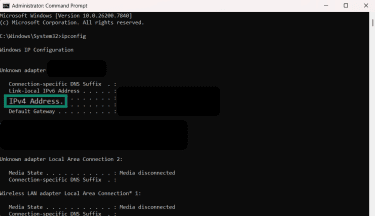
- Open Command Prompt and type in ipconfig, then press Enter. This will show your Windows device’s IP address. Write it down.
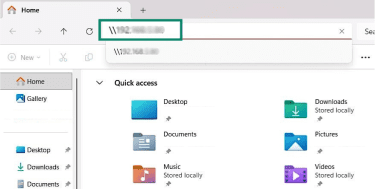
- Switch to your Mac and open a Finder window. Click Go, then Connect to Server.
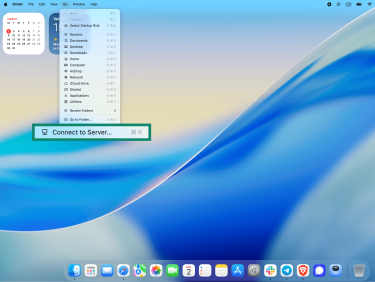
- Enter the Windows share address in the box in SMB format, such as smb://192.168.1.100/sharename, then click Connect. Apple also supports using the computer name instead of the IP address.

- When prompted, select Registered User. Then, enter your Windows account username and password (not your PIN), and click Connect.

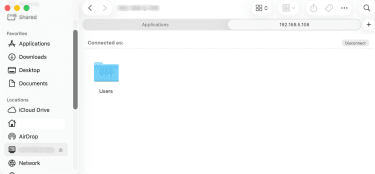
- Then return to Finder and locate the mounted Windows share under Locations in the sidebar. Open it to access your shared folder and drag and drop the files between the mounted Windows folder and your Mac to start transferring.
Transfer files from Mac to PC
The next sections focus on moving files from a Mac to a PC, using tools such as macOS’s built-in file sharing and external storage solutions.
Use macOS file sharing
Like Windows, macOS has a built-in file-sharing feature that enables file transfers from Macs to other platforms, including Windows PCs.
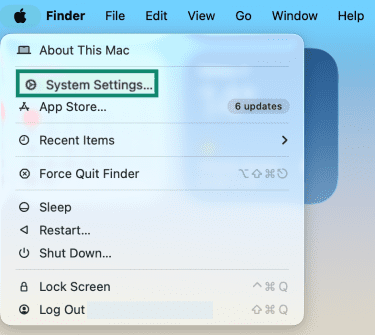
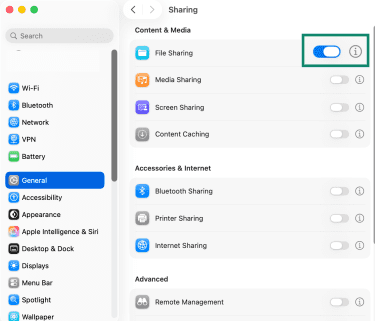
- Click the Apple icon on your Mac and select System Settings.
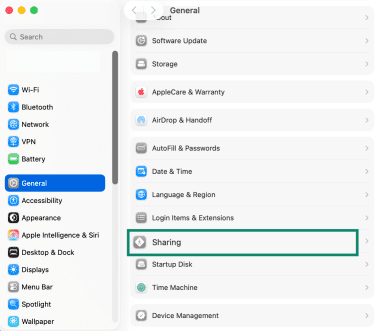
- Go to General, then select Sharing.
- Click the Info (i) button next to File Sharing, then turn File Sharing on.
- Click Options.

- In the SMB File Sharing window, toggle Share files and folders using SMB on. Note down the network address listed (often in the format smb:// followed by your Mac’s IP address). You’ll use just the IP address on Windows later, without the smb:// prefix.
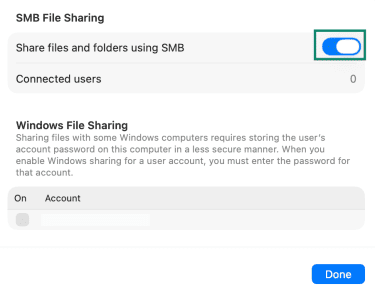
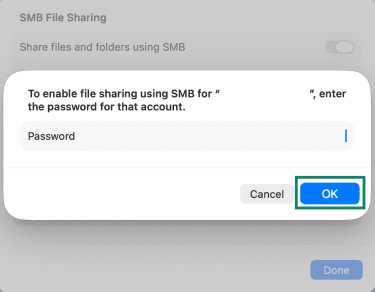
- Under Windows File Sharing, check the box next to the Mac user account you want Windows to use. Enter the Mac account password and click OK.
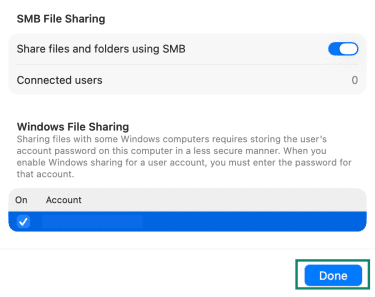
- Make sure the folder you want to transfer from is included in the shared folders list and that the selected user has permission to access it. Click Done in the SMB File Sharing window.
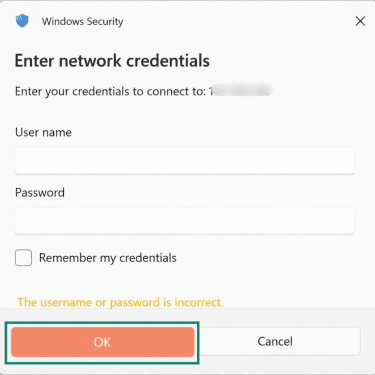
- Go to your Windows device and open File Explorer. Click the address bar and type in the Mac's network address using the Windows SMB path format. Be sure the address has two backslashes placed before the numbers, e.g., "192.168.1.100." Click Enter.
- In the Windows Security window, enter the User name and Password for the Mac account to access the device, then click Okay. Open the shared folder, then copy and paste the files and folders you want to transfer.
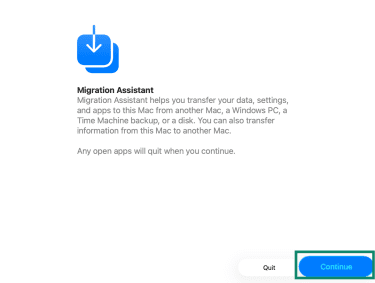
Use Migration Assistant
Apple’s Migration Assistant is designed for full-system migrations or large transfers of user data. It can move documents, apps, user accounts, settings, and other supported data from a Windows PC to a Mac, or from one Mac to another. It’s generally less suitable for small, selective file-only transfer
- Download and install the latest official Windows Migration Assistant that matches the macOS version on your Mac. Follow the on-screen instructions to complete the installation.
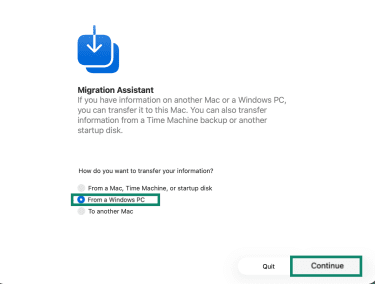
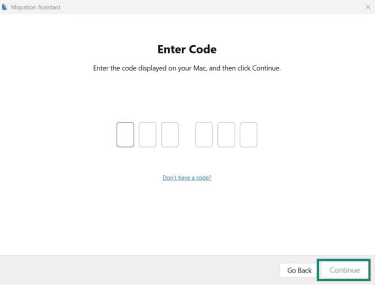
- Open Migration Assistant on your Mac and follow the on-screen instructions until you reach the page asking how you want to transfer information. Choose From a Windows PC and click Continue.
- When your Mac shows a code, enter it in Windows Migration Assistant on your PC, then click Continue.
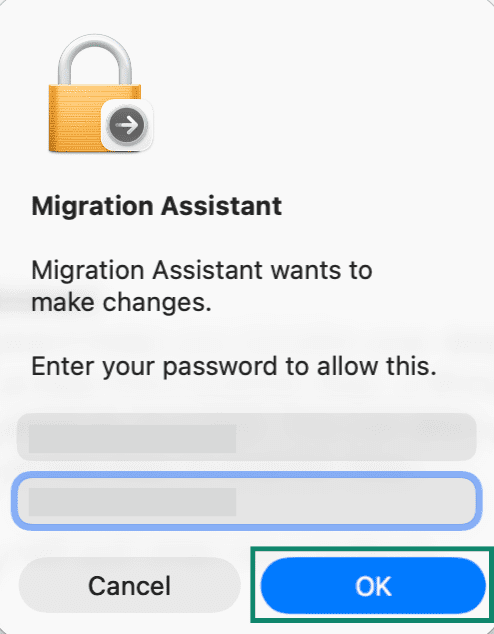
- Check the boxes next to the files and folders you want to transfer from the provided list to continue. You may be asked to enter your password at this stage to approve the transfer. Click Okay. After that, wait while the data moves from the PC to the Mac.
Other ways to share files between PCs and Macs
There are also several additional ways to share files between these platforms, whether from PC to Mac or Mac to PC.
Use an external drive
This offline method is ideal for transferring large files. For best results, use fast hardware, such as a high-speed SSD, and follow these steps:
- Connect the external device to your source computer, the one that contains the files you want to transfer.
- Format the device.
- On Windows, open File Explorer, right-click the drive, and select Format. For broad Windows–Mac compatibility, exFAT is usually the best choice, especially for drives over 32GB.
- On Mac, open Disk Utility, select the drive in the sidebar, and click Erase. Choose exFAT and confirm the erase process. Note that this will erase anything on the device, so be sure to back up any important data first. MS-DOS (FAT) is recommended for drives 32GB or smaller, and ExFAT for larger drives
- Copy the files and folders you want to transfer onto the external device. Use drag-and-drop or copy and paste in File Explorer on Windows or Finder on Mac.
- Safely eject the device.
- On Windows, eject the drive before disconnecting it. Microsoft recommends using the Safely Remove Hardware and Eject Media option in the taskbar.
- On Mac, drag the drive icon to the Trash or select Eject in Finder.
- Connect the device to the destination device and copy the files over, using either drag-and-drop or copy/cut and paste.
Use cloud storage
This method is great for transfers across different networks, smaller-to-medium files, or ongoing syncing. It requires internet access and works in both directions.
- On your source computer, sign into your chosen cloud service and install the desktop app if needed.
- Upload the files you want to transfer through the web interface or drag them into your synced folder, such as a OneDrive folder in File Explorer (Windows) or Finder (Mac).
- Wait for the upload to finish.
- Sign into the same account on your destination computer.
- Download the files or let them sync automatically.
Methods for small or one-off transfers
If you only need to send a small number of files from a PC to a Mac, or vice versa, you don’t need any of the above methods. Other options include:
- Email: Attach the files and send them to an email account you can access on the other device. Then sign in there and download them.
- Bluetooth: Pair the devices and transfer the files. This is one of the slowest options and is generally best for smaller items. On Mac, Bluetooth Sharing must be turned on in Sharing settings first.
- Dedicated platforms: File transfer tools, such as WeTransfer, let you upload files on one device and download them on another.
Troubleshoot common transfer issues
You may encounter issues when attempting to move files from one device to another. Here are tips to resolve some of the most common ones:
Network connection and discovery problems
- Ensure that both devices are on the same network when transferring files locally.
- Turn on File Sharing on Mac, and turn on Network discovery and File and printer sharing on Windows.
- If a virtual private network (VPN) is active, it may interfere with local discovery or routing. Temporarily disconnecting it can help in some setups. If the VPN app supports split tunneling, you may be able to keep file-sharing traffic on the local network while other traffic stays on the VPN.
Permission and login errors
- Confirm that you're using the correct login credentials for the machine or account in question.
- Verify that the shared folders are set up correctly and that you have the required access permissions.
Firewall and antivirus blocks
Check whether the firewall is blocking sharing connections. If needed, allow the relevant file-sharing app or service through the firewall. Apple notes that SMB sharing may fail if the Windows firewall blocks it, and its guidance references Transmission Control Protocol (TCP) port 445 for sharing connections.
Slow transfer speeds
- Switch to a wired Ethernet connection instead of Wi-Fi where possible.
- If you’re using external devices, opt for faster hardware such as USB-C, Thunderbolt, or SSD-based storage.
- Use SMB sharing rather than Apple Filing Protocol (AFP). Apple has deprecated the AFP client, and SMB is the current file-sharing standard on macOS.
- Check that neither device disconnects from the network or goes to sleep during long transfers.
File format and naming issues
- Watch for filenames that Windows does not accept. Copying from a Mac to a Windows computer can stop if a filename contains characters not allowed by Windows.
- If you’re transferring many files at once, compressing them into an archive can make the transfer easier to manage, but it's not usually required to preserve filenames or folder structure.
After the transfer
Once the transfer is complete, it’s recommended to:
- Verify: Check that all files have transferred correctly. Open a sample of them to confirm that nothing is missing, corrupted, or in the wrong location.
- Disable sharing after transfer: Once you’ve finished moving files around, disable any sharing features you no longer need.
- Set up backups on both devices: You can use built-in tools such as Windows Backup on PC and Time Machine on Mac to help protect your files.
- Remove duplicates: Review the files you transferred for duplicates or extra copies, and delete any you don’t need to save space.
- Re-enable features (if relevant): If you temporarily changed VPN, firewall, or sharing settings to complete the transfer, restore them afterward.
FAQ: Common questions about transferring files from PC to Mac
What's the safest way to transfer files from a PC to a Mac?
Can I transfer files from a PC to a Mac without losing data?
Can I transfer large files from PC to Mac without a USB drive?
Why can’t my Mac find my Windows PC on the network?
Why does Windows ask for a username and password when I connect from Mac?
Which external drive format works for both Windows and Mac?
Can I transfer apps and programs from PC to Mac?
Do the file dates and folder structure stay the same after the transfer?
Take the first step to protect yourself online. Try ExpressVPN risk-free.
Get ExpressVPN