How to boot your Mac in Safe Mode


If your Mac starts slowly, apps freeze, or the system feels unstable, Safe Mode can help you identify the cause. It starts macOS with a minimal set of system components, reducing background activity and preventing third-party software from loading. This makes it useful for troubleshooting startup problems, software conflicts, and unexplained system behavior.
This guide explains how to start your Mac in Safe Mode and when it’s most useful. It also covers what to try if Safe Mode doesn’t resolve an issue.
What is Safe Mode on Mac?
Safe Mode is a diagnostic startup mode that changes how macOS initializes the system. It prevents third-party software from interfering during startup so you can test whether a problem is caused by something you installed rather than macOS itself.
When you start your Mac in Safe Mode, macOS limits the system to core functionality only. It checks the startup disk for potential issues, removes some temporary system files, and blocks nonessential software (such as third-party extensions and fonts) from loading at startup. Essential system features, including basic internet connectivity, remain available so you can continue troubleshooting online.
Safe Mode vs. normal mode
When your Mac is running in Safe Mode, it may feel noticeably different from a normal startup. This is expected and confirms that Safe Mode is active.
- Visual performance is often reduced. Graphics performance is limited in Safe Mode, which can make animations and scrolling feel less smooth.
- Apps may take longer to open. Some features or accessories may not work as usual. This happens because non-essential drivers and background components are temporarily unavailable.
- Background activity is reduced. Services such as automatic syncing, cloud updates, or certain backup and security processes may pause temporarily while Safe Mode is enabled.
Benefits of using Safe Mode
Safe Mode is useful because it helps you understand where a problem is coming from, based on how your Mac behaves under different startup conditions. By loading only essential system components and limiting background activity, it creates a controlled environment for troubleshooting.
If your Mac works normally in Safe Mode but crashes, slows down, or behaves unpredictably after a standard restart, Safe Mode helps you identify the issue as software-related rather than a core macOS problem. This points to third-party apps, login items, or connected devices that load during a normal startup, giving you a clear direction for what to investigate next.
If the same issue appears both in Safe Mode and during a normal startup, Safe Mode still provides value by helping you rule out startup software as the cause. When problems persist in Safe Mode, they are more likely related to macOS itself, system files, or deeper configuration issues, which clarifies that removing apps or startup items is unlikely to resolve the problem.
Safe Mode can also help resolve minor issues on its own. During startup, macOS performs basic system checks and clears certain temporary system data. If the issue disappears after using Safe Mode and doesn’t return after restarting normally, the problem may have been caused by cached files or temporary background processes that Safe Mode corrected automatically.
Step-by-step: How to start a Mac in Safe Mode
Starting a Mac in Safe Mode is easy, but the method depends on the type of processor in your device. Apple silicon models and Intel-based Macs use different startup commands, so you need to confirm which one you have before you begin.
Determine your Mac type (Intel vs. Apple silicon)
- Select the Apple menu in the top-left corner of your screen, and choose About This Mac.
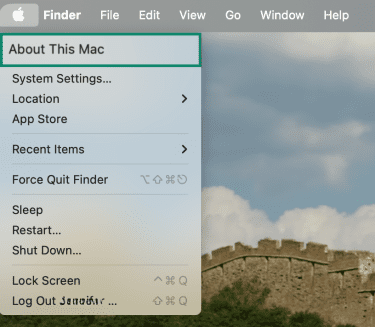
- In the window that appears:
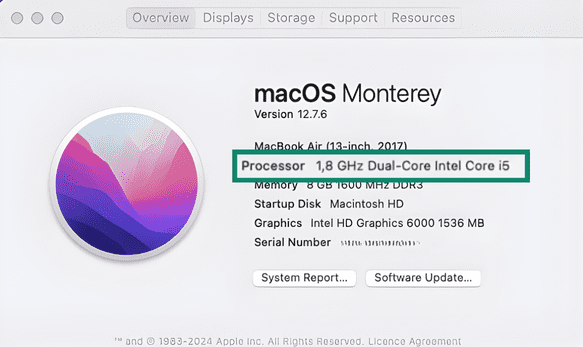
- Apple Silicon devices show a line labeled Chip, followed by something like Apple M1 or M2.

- Intel devices show a line labeled Processor, followed by an Intel processor name such as Intel Core i5 or i7.
After you confirm your Mac’s processor, follow the matching steps below.
Booting an Apple silicon Mac
These steps apply to any M1, M2, or M3 Mac:
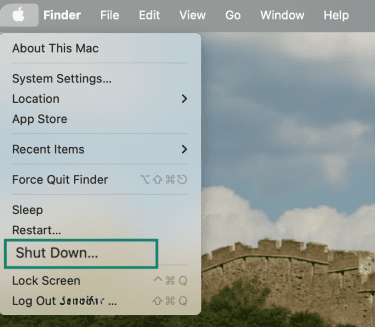
- Open the Apple menu, and choose Shut Down. Wait until the screen is completely black and any keyboard backlight or fan noises have stopped.
- Press and hold the power button until Loading startup options appears.
- Select your startup disk, which is typically named Macintosh HD.
- Press and hold the Shift key, then click Continue in Safe Mode.
- Your Mac will restart automatically. When the login screen appears, log in as usual.
Booting an Intel Mac
Intel-based Macs use a straightforward keyboard shortcut to start in Safe Mode.
- Power on or restart your Mac by choosing Apple menu > Restart.
- Immediately press and hold the Shift key as your Mac starts up.
- Release the Shift key when you see the login screen.
- Log in to your account.
- If asked to log in again, log into your account a second time.
Common mistakes to avoid
If your Mac starts normally instead of entering Safe Mode, the cause is usually a timing or method issue.
These are the most common reasons Safe Mode doesn’t activate:
- Using the wrong method for your Mac type: Macs with Apple silicon require holding the power button to access Startup Options. The Intel method of holding the Shift key during startup won’t work on those models. The reverse is also true.
- Pressing Shift at the wrong time on Intel Macs: Safe Mode won’t activate if the Shift key is pressed too late or released before the login screen appears. You need to hold it from startup until the login window loads.
- Using a Bluetooth keyboard on Intel desktops: Wireless keyboards may not connect early enough during startup. If Safe Mode isn’t triggering, try using your built-in or a wired keyboard instead.
- Firmware password enabled on Intel Macs: If a firmware password is enabled, Safe Mode won’t start.
How to tell if your Mac is in Safe Mode
The quickest way to confirm that Safe Mode is active is to check the login screen. If Safe Mode is enabled, you’ll see Safe Boot in the menu bar on both Intel and silicon Macs.
For a more precise check, you can use System Information to view the current startup mode.
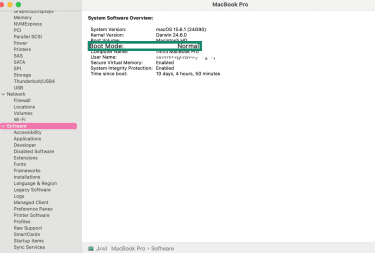
How to check Boot Mode in System Information
Open the Apple menu, then hold the Option (⌥) key and select System Information (it will only appear once you press the Option key). Click Software.
Look for Boot Mode in the details pane.
- If it says Safe, your Mac is running in Safe Mode.
- If it says Normal, your Mac started normally, and you’ll need to try the Safe Mode steps again.
What Safe Mode can fix (and what it can’t)
| Safe Mode can help with | Safe Mode can’t fix |
| Clearing certain system caches that may cause glitches or slowdowns | Hardware failures (disk, memory, GPU, other components) |
| Identifying third-party apps, login items, fonts, or extensions causing issues | Severe macOS corruption or missing system files |
| Isolating startup-related crashes, freezes, or long boot times | Corrupted user accounts or damaged user data |
| Running basic startup disk checks to stabilize minor directory issues | Data loss or recovery of corrupted files |
| Diagnosing performance or post-update instability by limiting background software | Problems caused by external services or networks |
| Testing whether peripheral issues are software-related | Issues requiring reinstalling or repairing macOS |
What to do If Safe Mode doesn’t fix the issue
If Safe Mode doesn’t resolve the issue, you may need to move on to deeper troubleshooting.
Check your startup items
If your Mac behaves normally in Safe Mode but shows problems during a standard startup, a login item is often the cause. Disabling startup items helps you isolate apps or background processes that load automatically and interfere with normal operation. Here’s what to do:
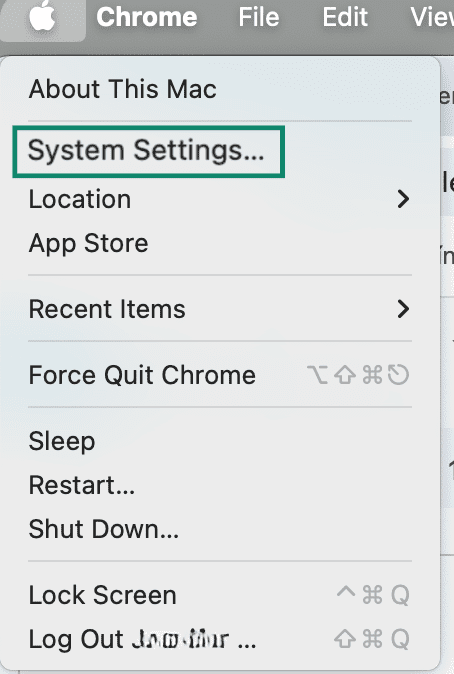
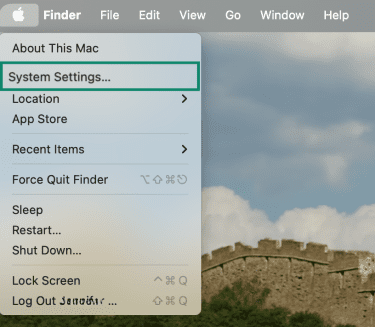
- Start your Mac normally and open System Settings (or System Preferences on older macOS versions).
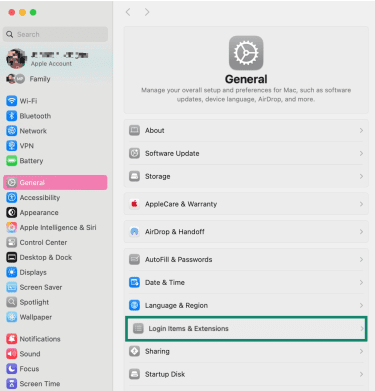
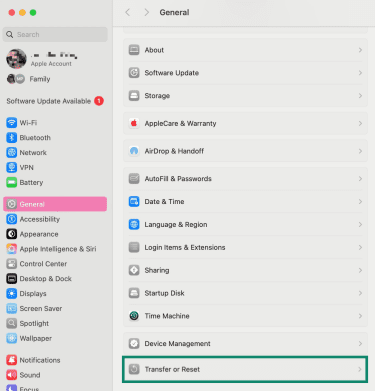
- Go to General > Login Items & Extensions (if you’re using an older version of Mac, open System Settings > Users & Groups, select your account, then choose Login Items).
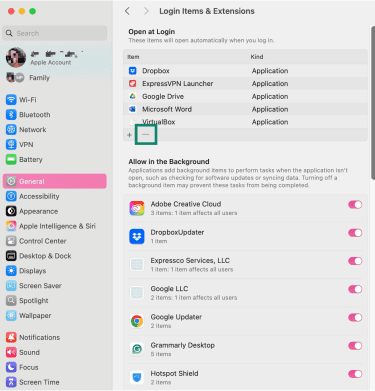
- You’ll see a list of apps that open automatically. You can stop them from launching at startup by selecting one and clicking the minus button below it. The app isn’t removed from your Mac, but it stays disabled until you re-enable it.
If disabling startup items doesn’t resolve the issue, the problem may be deeper than a login app or background process. At this point, it’s worth moving on to troubleshooting in macOS Recovery, where you can run Disk Utility, reinstall macOS if needed, or restore from a backup.
When you should skip Safe Mode and use Recovery Mode instead
You should go straight to recovery mode when:
- You need to erase your disk. If you’re preparing your Mac for resale, handing it to someone else, or starting fresh after persistent issues, erasing the startup disk must be done from Recovery Mode.
- You need to reinstall macOS: If your Mac can’t start or the operating system is severely damaged, reinstalling macOS from Recovery is often the most effective solution.
- You need to restore from Time Machine: Full-system restores must be initiated from Recovery Mode.
- You forgot your admin password: Recovery Mode includes password reset options that aren’t available during a normal startup.
- Disk Utility finds errors it can’t repair: Recovery Mode lets Disk Utility run deeper repairs than Safe Mode.
Using macOS Recovery Mode (Command + R)
To access macOS Recovery, follow these steps:
On Apple silicone Macs, shut down your Mac, then press and hold the power button until Loading startup options appear. Select Options, click Continue, and sign in if prompted.
On Intel Macs, turn on or restart your Mac, then immediately press and hold Command (⌘) + R until the Apple logo or a spinning globe appears. This starts macOS Recovery.
When Recovery loads, you’ll see the macOS Utilities window with options such as Restore from Time Machine, Reinstall macOS, and Disk Utility.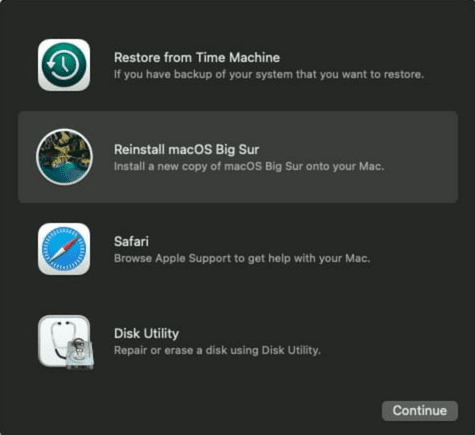
Use Time Machine restore
If disabling startup items didn’t find your issue, or if your Mac still won’t start normally, you can first try restoring your system to an earlier state using Time Machine. This is especially useful if the problem started recently, after an update or a new app installation.
On Apple silicon Macs, in macOS Recovery, select Restore from Time Machine and click Continue. Select your backup and follow the prompts to restore your Mac.
On Intel Macs, shut down your Mac and connect your Time Machine backup drive. Enter Recovery Mode on your Mac. When the macOS Utilities window appears, select Restore from Time Machine Backup. Follow the on-screen steps to pick your backup disk and choose the date you want to restore.
Running Disk Utility First Aid
First Aid can fix disk issues that macOS can’t repair during normal use.
Note: These Disk Utility steps apply to both Apple silicon and Intel Macs once you're in Recovery Mode.
To run First Aid from Recovery:
- In the macOS Utilities window, select Disk Utility and click Continue.
- In the menu bar, choose View > Show All Devices so you can see the full device and volume list.
- In the sidebar, select the lowest volume on your startup disk (for example, a Data volume), then click First Aid and choose Run.
- Repeat First Aid on each level of the disk until all checks are complete.
Reinstalling macOS without erasing data
If the disk passes First Aid but your Mac still crashes, freezes, or won’t start properly, reinstalling macOS can replace damaged system files without touching your personal data.
Before you begin, it’s still a good idea to have a backup, if possible.
Note: These steps apply to both Apple Silicon and Intel Macs once you're in Recovery Mode.
- In the macOS Utilities window, select Reinstall macOS, then click Continue.
- Make sure you have an active internet connection, as macOS needs to download the installer.
- When prompted, choose your existing startup disk, usually named Macintosh HD.
Your Mac will download a fresh copy of macOS and install it over your current system. It may restart several times. Your personal data stays untouched during a reinstall.
Perform a factory reset (last resort)
If troubleshooting and Recovery Mode don’t resolve the issue and no backup is available, a factory reset is the last remaining option. It fully erases the Mac and reinstalls macOS, leaving you with a clean system but no remaining user data.
Apple silicone Macs
On silicon Macs, the reset steps are simple to follow:
- Open System Settings.
- Go to General in the sidebar, and select Transfer or Reset.
- Click Erase All Content and Settings.
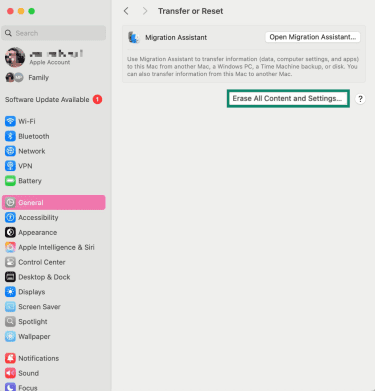
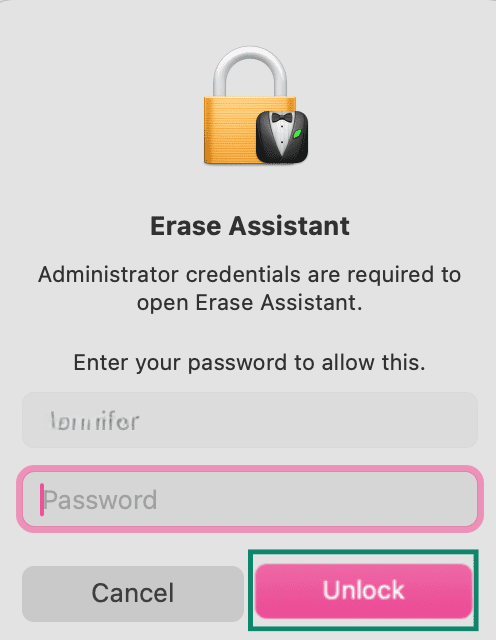
- The Erase Assistant window appears. Enter your administrator password, then click Unlock to continue.
Your Mac will walk you through signing out of your Apple ID, turning off Find My Mac, and securely removing your data. Once the reset is complete, your Mac returns to its original setup screen, just like when it was new.
Intel Macs
Intel Macs don’t include Erase All Content and Settings. To reset one, you must use Recovery Mode:
- Enter Recovery Mode on your Mac.
- Open Disk Utility and erase your startup disk.
- Return to the macOS Utilities window.
- Choose Reinstall macOS and follow the instructions.
Once the reinstall completes, the Mac starts as if it were new.
When to contact Apple Support
If you’ve tried all the steps above and the problem continues, you’ll need help from Apple Support.
Consider contacting Apple Support or visiting an Apple Store or authorized service provider if:
- First Aid can’t repair the disk (it may be a hardware issue).
- You notice physical signs of trouble, such as unusual noises or visible damage.
- The same crashes or freezes return even after a macOS reinstall.
- Your Mac will not start macOS Recovery at all, so you cannot access any of the tools described above.
FAQ: Common questions about booting your Mac in Safe Mode
How do I turn off Safe Mode on my Mac?
You can turn off Safe Mode by restarting your Mac normally. A regular reboot loads macOS with all components active, so the system starts without Safe Mode limits. You don’t need to change any settings for this to work.
What if Safe Mode doesn’t work?
If Safe Mode doesn’t solve the issue, keep troubleshooting by reviewing login items, restoring from Time Machine, or using Recovery Mode tools. These steps help isolate software issues that Safe Mode alone can’t repair. They also guide you toward deeper system fixes.
How do I know if Safe Mode is enabled?
You can confirm Safe Mode by looking for “Safe Boot” on the login screen. It will be usually be written in red in the top-right corner. Another option is checking Boot Mode in System Information, which shows whether the system started in Safe or Normal mode. Both methods give a clear confirmation.
What’s the difference between Safe Mode and Recovery Mode?
Safe Mode loads macOS with fewer components so you can troubleshoot basic software problems. Recovery Mode runs outside the system and gives you tools to repair disks, restore backups, or reinstall macOS. Each mode serves a different level of repair.
Will Safe Mode fix my Mac issues?
Safe Mode can help with minor software issues like corrupted caches or faulty extensions. It won’t fix hardware problems or severe system corruption, but it’s a good first step to rule out common causes. For deeper issues, you’ll need other tools.
Is Safe Mode safe to use regularly?
Safe Mode is safe, but it’s not designed for everyday use. It limits features, reduces performance, and disables some drivers, so it’s best reserved for troubleshooting. Use it when needed, then restart normally once you’re done.
Take the first step to protect yourself online. Try ExpressVPN risk-free.
Get ExpressVPN